Sunday, January 18, 2015
Building Form Continued
Its been over a week since my last blog entry and I had hoped to have more progress on the building form completed. I had been delaying doing a blog entry for that very reason. However, things being what they are, progress slowed while I worked on other things (including re-arranging my garage so I have more working room on the boat).
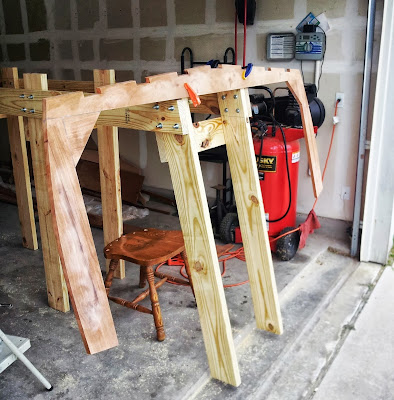
Form construction this week basically involved correcting the issues found in the trial run, adding some bracing (but not all yet), and leveling the form. I have determined that I can mount the form to the garage floor rather than make it movable. This has been my preference all along, but I had to remain open minded about the possibility of adding casters. There appears to be sufficient room on both sides (not a huge amount, but doable).
As you can see, the legs are now on the inside. This photo doesnt show the aft most legs since they hadnt been installed yet. It turned out that the horizontal assembly on the left side of the picture was mismeasured. Each leg (except the first) is supposed to line up with a 36" mark, starting from the end closest to the viewer. I did this correctly on the closer horizontal assembly, but on the other assembly, I started measuring the 36 from the first legs mark, which is 3/4" from the end. Thus all the marks were off by this amount. So that had to be corrected.

Next step was to install the remaining rear most legs (where the transom mounts). These have to be mounted at an angle of 14 degrees (plus or minus 1 degree). At first I was a bit confused where to line the leg up horizontally, but a careful look at the plans seemed to indicate that they would line up 3/4 inch forward of the last 36 inch mark using the bottom edge. In other words, if you imagine the transom frame as being 3/4" and lying flat on the angled legs, then the outside edge of the transom frame would line up with the 36" mark on the lower edge of the horizontal member. The horizontal members are then cut flush with the legs.
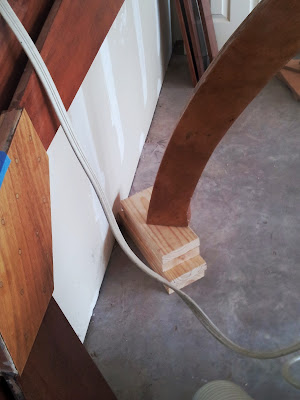
As you can see, the legs dont reach the ground because of a step in the garage floor. This was a mistake on my part since I had measured their length based upon calculations for a finished height and because I had forgotten about the step. In other words, I forgot the rule measure twice, cut once!
Not a huge problem as it turns out since the garage angles down towards the opening from the back wall, and the entire assembly had to be leveled up . I ended up adding leg extensions after I got the entire assembly level (more on leveling in a moment). This is where my inexperience, and occasional lack of patience caused me to have more work than necessary. If I had reread the information I had about building the setup form, I would have seen that the process was to make and install the legs to the floor first, then install the horizontal members level.
As for leveling, well, the form needs to be level fore and aft and side to side. Fortunately, I had paid a lot of attention to the constructing the two horizontal assemblies and they are level side to side at all points on the form. The fore and aft leveling was accomplished by lifting up the transom end and placing wood scrap under on set of legs until the fore and aft level point was reached. Then the previously mentioned leg extensions were added.
So if I had to do it over, of course I would do it the way the instructions mention. It would have been easier. But the good thing is that I was able to adapt to the situation and correct it. And I was reminded of the need to slow down and think things through more before moving on to the next task.
After getting the extensions on, I could finally see where the form would fit in relation to my garage. I alway knew it would be close, but seeing it in person drove home just how close it is. The next two photos show the front and aft ends of the boat. You can see just how close they are to the back wall and the garage door. With the great weather we have here in Austin, opening the garage door to work on the transom is usually no problem.. And I think I will be able to work with the front end since it will be relatively narrow there.

Form construction this week basically involved correcting the issues found in the trial run, adding some bracing (but not all yet), and leveling the form. I have determined that I can mount the form to the garage floor rather than make it movable. This has been my preference all along, but I had to remain open minded about the possibility of adding casters. There appears to be sufficient room on both sides (not a huge amount, but doable).
As you can see, the legs are now on the inside. This photo doesnt show the aft most legs since they hadnt been installed yet. It turned out that the horizontal assembly on the left side of the picture was mismeasured. Each leg (except the first) is supposed to line up with a 36" mark, starting from the end closest to the viewer. I did this correctly on the closer horizontal assembly, but on the other assembly, I started measuring the 36 from the first legs mark, which is 3/4" from the end. Thus all the marks were off by this amount. So that had to be corrected.
Next step was to install the remaining rear most legs (where the transom mounts). These have to be mounted at an angle of 14 degrees (plus or minus 1 degree). At first I was a bit confused where to line the leg up horizontally, but a careful look at the plans seemed to indicate that they would line up 3/4 inch forward of the last 36 inch mark using the bottom edge. In other words, if you imagine the transom frame as being 3/4" and lying flat on the angled legs, then the outside edge of the transom frame would line up with the 36" mark on the lower edge of the horizontal member. The horizontal members are then cut flush with the legs.
As you can see, the legs dont reach the ground because of a step in the garage floor. This was a mistake on my part since I had measured their length based upon calculations for a finished height and because I had forgotten about the step. In other words, I forgot the rule measure twice, cut once!
Not a huge problem as it turns out since the garage angles down towards the opening from the back wall, and the entire assembly had to be leveled up . I ended up adding leg extensions after I got the entire assembly level (more on leveling in a moment). This is where my inexperience, and occasional lack of patience caused me to have more work than necessary. If I had reread the information I had about building the setup form, I would have seen that the process was to make and install the legs to the floor first, then install the horizontal members level.
As for leveling, well, the form needs to be level fore and aft and side to side. Fortunately, I had paid a lot of attention to the constructing the two horizontal assemblies and they are level side to side at all points on the form. The fore and aft leveling was accomplished by lifting up the transom end and placing wood scrap under on set of legs until the fore and aft level point was reached. Then the previously mentioned leg extensions were added.
So if I had to do it over, of course I would do it the way the instructions mention. It would have been easier. But the good thing is that I was able to adapt to the situation and correct it. And I was reminded of the need to slow down and think things through more before moving on to the next task.
After getting the extensions on, I could finally see where the form would fit in relation to my garage. I alway knew it would be close, but seeing it in person drove home just how close it is. The next two photos show the front and aft ends of the boat. You can see just how close they are to the back wall and the garage door. With the great weather we have here in Austin, opening the garage door to work on the transom is usually no problem.. And I think I will be able to work with the front end since it will be relatively narrow there.
Still to do is add another set of braces on the lower portions of the legs, add a horizontal member that extends forward (to mount the forward part of the stem to), and secure the form to the garage floor. I will probably also add some additional cross bracing on each side between the legs.
But before I do any of that, I will have to complete the task of rearranging the garage. One of the previous photos showed my air compressor which will have to move. Im in the process of adding additional ceiling storage so that I can get stuff off of the floor. A sad fact of modern homes is that garages are no longer made for full size automobiles, hence they are limited in storage capacity. Add in lawn equipment (mower) and space gets cramped quickly. Im still trying to work out a solution to this that doesnt require building a shed in the yard.
Thats it for now. I dont expect there to be a lot of progress over the next several weeks since I have gotten to a point of having to make a fairly large purchase of lumber and will need to save some money to do so.
For anyone that is waiting for me to post another entry, I apologize for the lack of interesting material. I will therefore probably spread the blog entries out a bit from time to time from now on for this very reason. Take care.
Subscribe to:
Post Comments (Atom)
No comments:
Post a Comment